- Detecting memory leaks
- Detecting CPU hogs
- Detecting thread deadlocks
jvisualvm is a java bundled tool (and I quote):
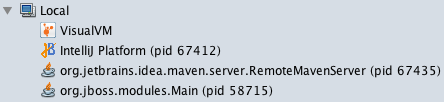
that provides a visual interface for viewing detailed information about Java applications while they are running on a Java Virtual Machine (JVM)If you want to use it with a local running application, it's quite straightforward. Just launch jvisualvm and your running java application server will be listed on the local processes:
Now, if you want to do the same with a remotely running application server, Wildfly comes with everything you need to do it, out of the box.
You will have to launch jvisualvm with additional classes on classpath like this:
jvisualvm --cp:a $JBOSS_HOME/bin/client/jboss-cli-client.jarHere, $JBOSS_HOME is an environment variable, pointing to your local Wildfly installation (despite you are running Wildfly remotely, you still need this library locally). You will need access to the administration console. By default, you can access it through the 9990 port like this:
http://192.168.67.67:9990
If you can't access it (by default, Wildfly only binds that port to the 127.0.0.1 interface), you can change your Wildfly configuration to allow LAN access to that port, or use a SSH TUNNEL (this sounds harder, but it's simpler actually).
Now, with jvisualvm running, and making sure you have access to the Administration Console within the monitoring workstation, just follow these three simple steps:

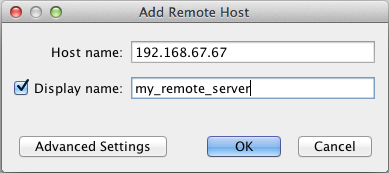
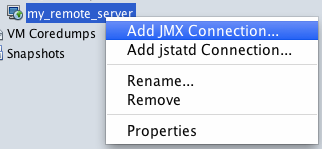
2. You will get a new icon labeled "my_remote_server" (or whatever you set up on "Display name" text box). Right click that new icon and select "Add JMX connection..." option.
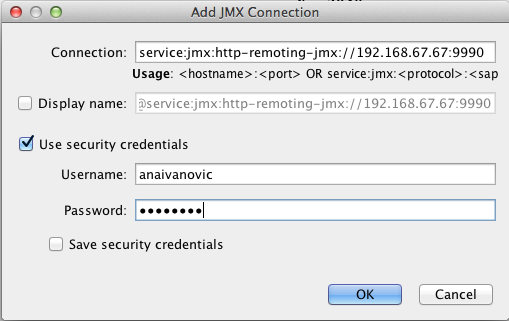
3. Setup the JMX connection with the following URL, username, and password.
3. Setup the JMX connection with the following URL, username, and password.
- service:jmx:http-remoting-jmx://192.168.67.67:9990
- admin
- password
Assuming, admin is a Administration Console enabled user with the right privileges.
I have read your blog its very attractive and impressive. I like it your blog.
ReplyDeleteJavaEE Training in Chennai JavaEE Training in Chennai Core Java 8 Training in Chennai Java 8 Training in Chennai Java Online Training Java Online Training
Java Training in Chennai Java Training in Chennai Core Java Training in Chennai Core Java Training in Chennai